Why a Cardboard Box Can Actually Make Sense for Drying Cannabis
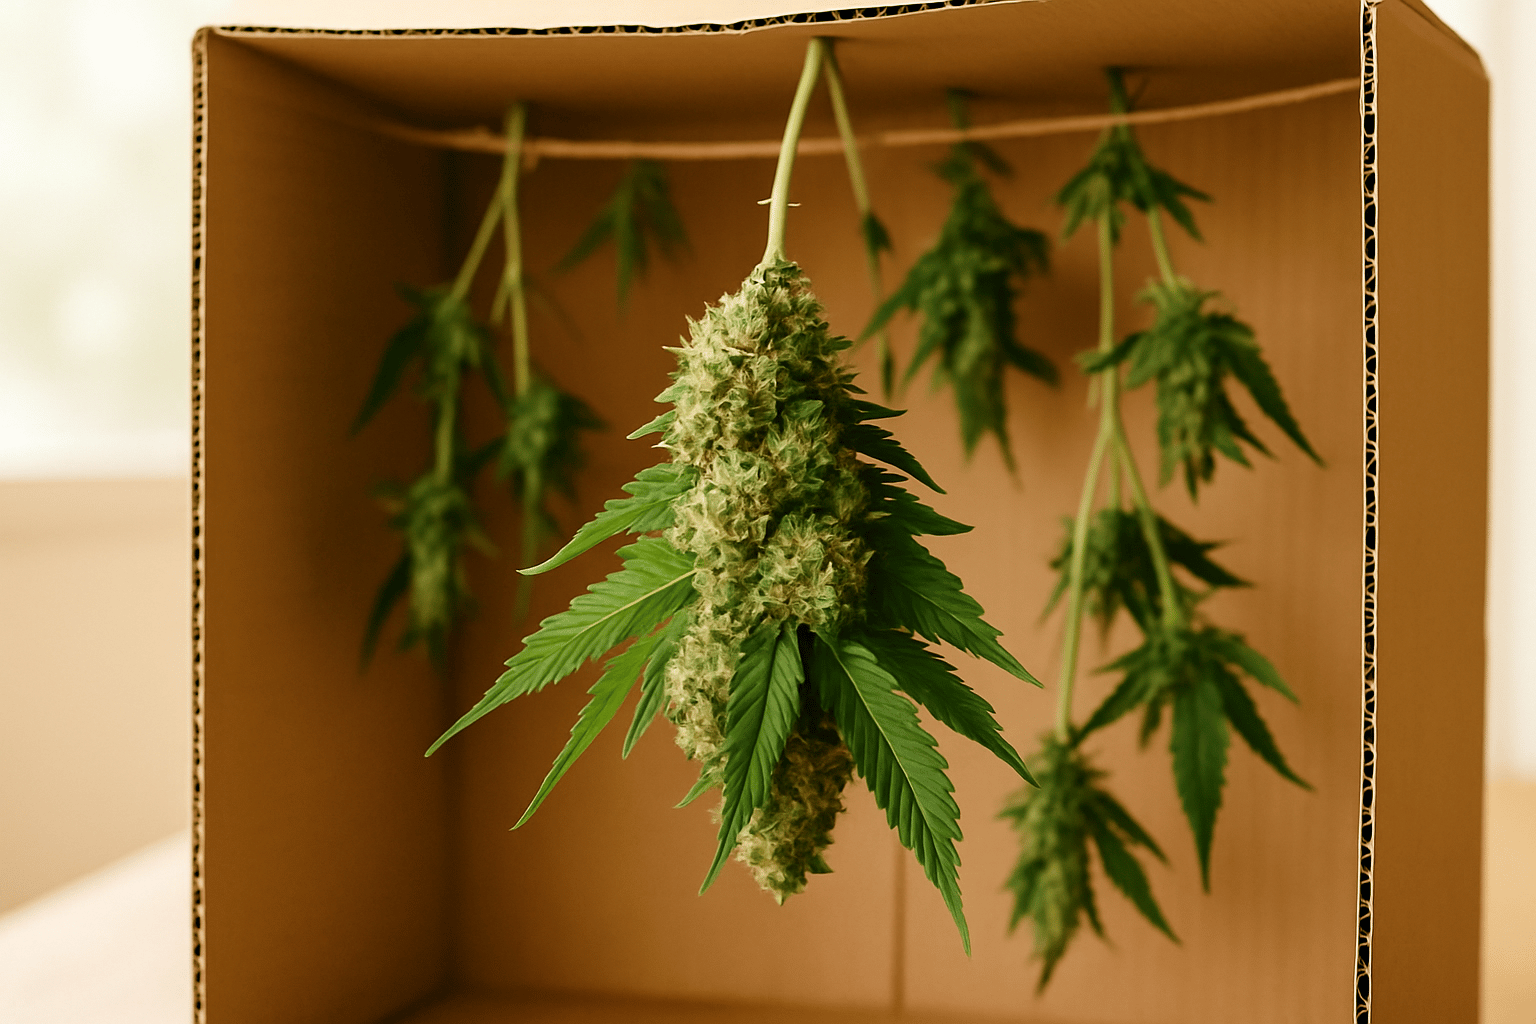
At first glance, a simple cardboard box may seem like a stopgap solution. In practice, however, it can be a surprisingly useful drying tool—especially for smaller harvests, individual test plants, or growers who do not have a separate drying cabinet available. Over the years, we have repeatedly seen that a well-prepared box can deliver better results than an overly warm storage room or improvised drying on an open rack in an unsuitable room.
The biggest advantage lies in the microclimate. Cardboard is breathable, buffers slight humidity fluctuations, and protects the flowers from direct light. That is exactly what matters, because cannabinoids and especially terpenes react sensitively to heat, excess oxygen, and UV light during the drying phase. If flowers dry out too quickly, the outside is often already crispy while residual moisture remains inside. Later, during curing, this leads to unstable jars, musty odor, or even mold.
Another point is discretion. A cardboard box is easier to place inconspicuously than an open drying net. Still, no one should fool themselves: it does not eliminate odor. Anyone drying strongly aromatic cultivars should take odor management seriously. Our article Understanding Cannabis Odor: Causes, Influencing Factors, and Practical Tips for Cultivation, Harvest, and Storage fits well here, because fresh flowers release terpenes and plant moisture very intensely, especially during the first days of drying.
However, it is also important to understand the limits of this method: a cardboard box does not replace real climate control. For large harvests, high room humidity, or very dense outdoor flowers with a mold risk, a controlled drying room is usually the safer choice. So the box is not a miracle cure, but a tool—and how well it works depends heavily on how cleanly you organize harvest, pre-trimming, airflow, and post-harvest curing.
The Ideal Conditions: Temperature, Humidity, and Air Exchange
When talking about proper drying, the first priority is not the container, but the climate. In our experience, the best range for slow, quality-preserving drying is around 16 to 20 °C and 55 to 62% relative humidity. Many growers roughly aim for 18 °C and 60% RH—for good reason. In this window, flowers dry slowly enough that chlorophyll and residual plant compounds are not too aggressively “locked into” the flower, yet fast enough not to encourage mold.
Excessively high temperatures above 22 to 24 °C are one of the most common quality killers. Volatile terpenes evaporate much faster under those conditions. The result is often a flower that looks fine visually, but smells flat and remains harsh when smoked. Humidity that is too low, below 50%, often causes the material to seem dry on the outside within two to four days while water is still trapped inside. This rapid surface drying is exactly what many later describe as a “hay smell.”
Air exchange is just as important. A cardboard box must never be airtight. The moisture released from the flowers has to be removed in a controlled way. At the same time, the air must not move so strongly that the buds are directly blasted and overdried. A common beginner mistake is pointing a fan directly at the box or even into it. A gentle air exchange in the room or light, indirect exhaust nearby is better.
If you already had trouble bringing your plants cleanly to maturity during the grow, it is worth looking at harvest preparation. Plants that were overfed, watered too late, or stressed often dry more unevenly and retain a green, sharp aftertaste for longer. Our guides Harvesting Cannabis: The Right Timing, Clean Technique, and Maximum Quality and Fertilizing Cannabis: Nutrients, Dosage, and Common Mistakes Under Control are helpful here, because drying quality is already influenced before the cut.
How to Prepare the Cardboard Box Properly
The box itself should be clean, dry, and as odor-neutral as possible. Do not use heavily printed, oily, or chemically smelling packaging. Sturdy moving boxes or neutral shipping boxes with sufficient volume are ideal. A box that is too small is problematic because moisture builds up inside and the flowers hang or lie too close together. For small amounts, a box around 50 to 70 cm high, 30 to 40 cm wide, and 30 to 40 cm deep often works well.
Cut several air holes into the side walls or into the lower and upper sections. Fresh air can enter from below, while warm, humid air can escape from above. The openings do not need to be huge. Several small holes are usually better than two large ones because the airflow is distributed more evenly. If you want to dry very discreetly, you can cover the holes with fine dust or insect protection fleece. This reduces light and dirt intrusion, but must not restrict air exchange too much.
Inside, there are two proven options: hanging or laying flat. For hanging drying, strings, wooden rods, or wire can be stretched through the box. Whole branches or smaller limbs are then hung with some spacing between them. For flat drying, racks, nets, or perforated cardboard layers are suitable. Flat drying is more appropriate for smaller buds or flowers that have already been roughly manicured. In that case, they must be checked regularly and turned carefully so that no pressure marks or damp contact surfaces develop.
One practical point: darkness is good, but total heat buildup is bad. That is why the box should not be crammed into a tight closet with no air movement. A quiet, dark room with a stable climate is better. Basements sometimes work well, sometimes not at all—depending on humidity. Attics are almost always too warm in summer. Anyone drying outdoor material should be especially attentive, because thick autumn flowers often carry more residual moisture and a higher botrytis risk. Our article Botrytis in Cannabis: Causes, Identification, and Control is relevant here.
Wet Trim or Dry Trim – What Works Better in a Cardboard Box
Whether you wet trim before drying or dry trim afterward makes a noticeable difference in a cardboard box. With wet trimming, large fan leaves and often part of the sugar leaves are removed directly after harvest. This reduces plant mass and moisture inside the box. In more humid environments, this is often the safer method because it lowers the mold risk and allows air to reach the flowers more easily.
With dry trimming, more leaves remain on the flower. This slows drying down, which can definitely be an advantage in dry room air. Especially in heated apartments during autumn or winter, we have often seen that a light leaf cover protects buds from drying out too quickly. Terpenes are then often preserved better, and the flowers dry more evenly. The downside: you need more space in the box and have to watch much more carefully for pockets of moisture.
In many cases, a good middle ground is the “hybrid trim.” Here, you remove only the large fan leaves without resin directly after harvest and leave the smaller sugar leaves on for the time being. This reduces unnecessary moisture without fully exposing the flower. For box drying, this is often the most practical approach, especially with medium-sized indoor buds.
Which method is better also depends on the plant structure. Loosely built, sativa-leaning flowers are more forgiving, while compact indica or hybrid buds develop critical moisture pockets more quickly. If you want to dive deeper into flower structure, maturity, and morphology, our article Cannabis Flowering Stage: How to Control Yield, Resin Production, and Quality helps clarify why some genetics react much more sensitively during drying than others.
Step by Step: How to Dry Cannabis Properly in a Cardboard Box
Right after harvest, the plants or branches should not be left in the sun or sitting around in a warm room. Freshly cut material should be moved promptly into the prepared drying environment. You can remove large fan leaves beforehand. Then hang the branches with enough spacing or place individual buds loosely on a rack. Nothing should touch if you can avoid it—contact points stay moist longer.
During the first 24 to 48 hours, the humidity inside the box often rises noticeably. That is normal. This is when it becomes clear whether the air openings are sufficient. If the box smells stale or the walls feel damp, it needs more air exchange. In our experience, daily checks are mandatory, but without unnecessary handling of the flowers. Every touch damages trichomes and compresses the surface.
From day 3 to 5 onward, the outer layer usually starts to become drier. Small buds are often already much further along than thick main colas. That is exactly why you should not harvest and dry everything strictly by the calendar, but judge it by condition. A classic mistake is putting everything into jars at the same time just because part of the harvest already “snaps.” Large flowers often need more time or should be split before drying so that the core does not remain too wet.
As a rough guideline, box drying usually takes 5 to 10 days. In very dry air, it can go faster; in cool and humid conditions, it can also take 10 to 14 days. The material is ready for the next step not when it feels bone dry, but when small stems snap slightly when bent while thicker branches are not yet completely brittle. The buds should feel dry on the outside, but not hard, and should still give just slightly when pressed.
| Parameter | Recommended Range | Practical Note |
|---|---|---|
| Temperature | 16–20 °C | Above 22 °C, terpene loss increases significantly |
| Humidity | 55–62% RH | Below 50%, the surface often dries too quickly |
| Drying time | 5–10 days | Large colas often need longer than small buds |
| Air movement | Gentle, indirect | Never blow directly onto the flowers |
| Light | As dark as possible | Protects cannabinoids and terpenes |
The Most Common Mistakes When Drying in a Cardboard Box
The most common mistake is too little air exchange. Many people close the box almost completely because they want to minimize odor and light. That leads to stagnant, humid air—exactly the conditions in which mold develops. This is especially risky with dense, late-harvested outdoor flowers or with plants that already experienced high humidity in the grow room.
The second major mistake is drying too quickly. This often happens in apartments with heated air, with boxes that are too small, or when a fan is pointed directly at the setup. The buds then feel dry on the outside very quickly, but smell like grass, hay, or nothing at all. Many mistake this for a “normal fresh smell.” In reality, the drying was too aggressive, and the flower never had a proper transition phase into curing.
Another practical mistake is excessive handling. Beginners in particular pick up the flowers several times a day, squeeze them, constantly open the box, or rearrange everything. That does more harm than good. A visual inspection and a quick climate check are enough. If you want to measure, use a small hygrometer in the room or near the box. Measuring directly inside between the buds can be helpful, but in very small boxes it is often of limited value because every opening changes the microclimate.
You should also not underestimate the pre-existing condition of the harvested material. Buds with powdery mildew, botrytis, pest residue, or too much leaf matter should not simply be placed blindly into the box. Problematic material must be sorted out. Cutting corners here puts the entire batch at risk. That is exactly why clean work from cultivation through harvest is so important—drying does not rescue a flawed or diseased harvest; it only preserves the condition you put into it.
When the Flowers Should Come Out of the Box and How Curing Succeeds
The box is only the first phase. Once the flowers have reached the right level of dryness, curing begins in jars or suitable containers. This step is often underestimated, even though it is crucial for aroma, smoking behavior, and uniformity. Storing too early is risky; storing too late makes the buds dull and dry. In our experience, the ideal transition is reached when the outside is dry but the flower core does not yet feel completely hardened.
For curing, fill the containers only to about 70 to 75%. This leaves enough air volume for controlled moisture equalization. During the first few days, the jars should be opened briefly once or twice a day if residual moisture is still somewhat elevated. If the relative humidity in the jar rises permanently above about 65 to 68%, the material was still too wet and should be taken out again. If it remains stable in the range of about 58 to 62%, that is a very good range for curing and later storage.
This is exactly where it becomes clear whether the box drying was done properly. Well-dried flowers develop a clearer, cultivar-typical aroma during curing. Poorly dried material often remains flat, grassy, or harsh. If you want to go deeper into this step, our article Curing Cannabis: How Aroma, Effects, and Quality Mature Properly is the right companion, because in practice drying and curing are not opposites, but two sequential phases.
A realistic timeframe for curing is at least two to four weeks. High-quality flowers often even benefit from six to eight weeks if humidity is controlled properly. The rule is: maturity improves a lot, but it cannot repair burned-off terpenes or moldy cores. So the cardboard box is not the end of the process, but the bridge between harvest and storage quality.
Who This Method Is Suitable For – and When You Should Dry Differently
Drying in a cardboard box is especially suitable for small to medium quantities, for home growers with limited space, and for situations where a simple, light-protected, and low-cost solution is needed. The method is also practical for sample harvests from individual plants or phenotypes, because batches can be dried separately and compared. This is especially useful when testing genetics and wanting to assess aroma differences cleanly.
The cardboard box is less suitable for very large harvests, extremely compact colas, or rooms with permanently high humidity. If your drying room is already at 65 to 75% RH, a box will not solve the problem and will usually make it worse. In such cases, what you need is more likely a dehumidified room, a small drying box with active exhaust, or at least a properly controlled environment. Even for medically oriented use, where reproducible quality matters, you should work as precisely as possible.
In our experience, the cardboard box method is strongest when it is used deliberately rather than improvised. A cleanly prepared box, good harvest material, moderate leaf mass, stable room conditions, and daily monitoring—this combination can produce very respectable results. On the other hand, anyone hoping that some closed cardboard box in a warm room will somehow save the harvest often experiences the opposite.
If you want to improve your entire grow from genetics to harvest quality, it is also worth taking a look at our Grow Guide. Proper drying does not begin only after cutting, but with healthy plants, clean flowering management, and harvesting at the right time.
Sources
- Rosenthal, Ed – “Marijuana Grower’s Handbook”, 2021
- Cervantes, Jorge – “Marijuana Horticulture: The Indoor/Outdoor Medical Grower’s Bible”, 2015
- Small, Ernest – “Cannabis: A Complete Guide”, 2016
- United Nations Office on Drugs and Crime – “Recommended Methods for the Identification and Analysis of Cannabis and Cannabis Products”, 2009
About the Author – Ben
Ben has been intensively involved in the cultivation and care of cuttings and the healthy development of plants during the growth phase for several years. His focus lies on low-stress training methods, stable growth conditions, and avoiding common care mistakes. The content is based on practical experience, proven methods, and real observations from daily work with young plants.
Expert contribution & updates: Hannah – Research, contextualization of current methods and observation of new developments.
This article was created with AI support and editorially reviewed.
More about the team behind LeafConnect