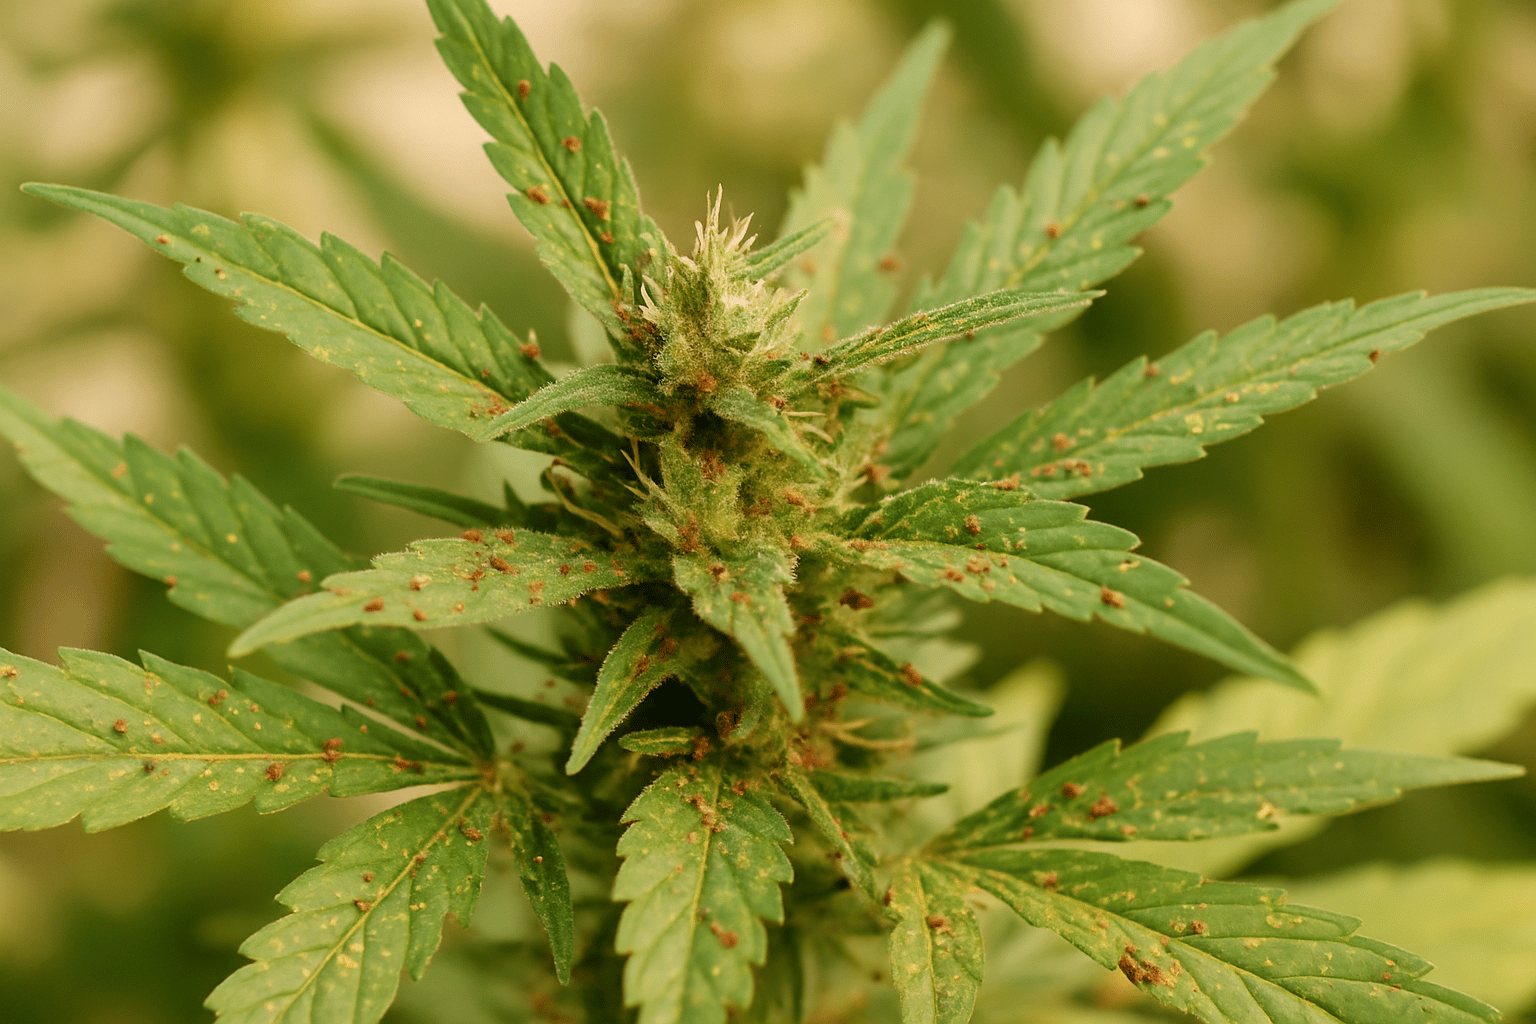
Why pests quickly become a real problem in cannabis cultivation
Pests are among the most common causes of stalled growth, deformed leaves, and disappointing harvests. In cannabis, this matters especially because the plant reacts very differently during the vegetative and flowering stages. A light thrips infestation in early veg is often still easy to control. But the same infestation in dense flower formation can quickly reduce quality, trigger stress, and encourage further problems such as secondary infections.
In our experience, many growers do not underestimate the pest itself, but rather the speed at which populations build up. Spider mites, thrips, or fungus gnats seem harmless at first. A few pale speckles on the leaves, individual flying insects above the substrate, slightly twisted new growth. If treatment only begins once the damage is clearly visible, the infestation is usually already established. That is exactly why pest management in cannabis is above all a matter of routine: inspect, interpret correctly, intervene early.
Environmental conditions also play a major role. Dry, warm air favors spider mites. Permanently wet substrate encourages fungus gnats. Overly dense growth, poor air movement, and inconsistent hygiene create ideal conditions for several problems at once. Anyone who manages climate, watering behavior, and plant vitality properly often reduces pest pressure more effectively than with any single spray treatment. If you want to make your crop more stable overall, it is also worth looking at Watering cannabis correctly: mastering water, timing, and common mistakes and Growing cannabis in a greenhouse: climate, protection, and strong harvests under controlled conditions.
The most common cannabis pests and their typical symptoms
The most important pests in cannabis cultivation are spider mites, thrips, fungus gnats, aphids, whiteflies, and in some cases broad mites. Depending on region or season, caterpillars, leaf miners, or root issues caused by larvae of other substrate pests may also occur. The key is to distinguish between the different damage patterns. Many growers confuse pest infestations with nutrient deficiencies, light stress, or pH problems. That wastes time and makes the situation worse.
Spider mites initially cause fine pale stippling on the upper leaf surface. Later, leaves appear dull, blotchy, and dry. On the underside of the leaves, eggs, mites, and fine webbing can often be seen with a magnifier. It becomes especially critical at temperatures above 26 to 28 °C and low humidity. Thrips leave silvery scraping marks, irregular pale streaks, and small black fecal spots. They like to sit on leaf undersides and in young tissue. Fungus gnats are often not a direct leaf problem, but a root problem: the adult gnats are annoying, while the larvae in the substrate damage fine roots and significantly slow down young plants.
Aphids tend to gather on shoot tips, leaf stems, and soft tissue. Typical signs are sticky residue from honeydew, curled young leaves, and generally unsettled growth. Whiteflies suddenly take flight when the plant is touched; their feeding activity weakens the leaves, and the honeydew can promote sooty mold fungi. Broad mites are particularly deceptive because they are practically invisible without magnification. The damage often looks like a deficiency or heat stress: distorted new growth, thickened, glossy, or twisted leaves, and stalled tips. We have a specialized guide on this at How to identify and effectively control broad mites in cannabis.
| Pest | Typical signs | Favorable conditions | Especially dangerous in |
|---|---|---|---|
| Spider mites | pale speckles, dull leaves, webbing | warm, dry, low humidity | late veg, early to mid flower |
| Thrips | silvery feeding scars, black fecal spots | dry climate, dense canopy | all stages, especially young plants |
| Fungus gnats | small black flies, weak roots | overly wet substrate, organic surfaces | seedlings, cuttings, young plants |
| Aphids | honeydew, distorted new growth | soft tissue, outdoor, greenhouse | veg and pre-flower |
| Whiteflies | insects taking flight, sticky leaves | warm, sheltered spaces | indoor and greenhouse |
| Broad mites | deformed tips, stunted growth | warm, hidden introduction via cuttings | young plants and mother plants |
Early detection: how to inspect plants properly
The best pest control does not start with a product, but with inspection. We recommend checking each plant specifically at least two to three times per week, and even briefly every day for mother plants and cuttings. A quick glance from above is not enough. Check leaf undersides, shoot tips, the zone directly above the substrate, and the underside of the lower fan leaves. Many pests start low down or in fresh growth, not in the middle of the canopy.
Three tools have proven especially practical: a 30x to 60x magnifier, blue and yellow sticky traps, and a clean white sheet of paper. Thrips or mites can often be detected by gently shaking a leaf over the paper. Sticky traps are not a cure, but they are a good early warning system: yellow for flying pests such as whiteflies or fungus gnats, blue often helpful for thrips. The important thing is not just to hang the traps, but to evaluate them systematically. If the number of captured insects suddenly rises, you need to find the source.
A common mistake is judging only visible damage. Some symptoms lag behind the infestation by several days. With fungus gnats, the plant is often already weakened in the root zone before anything is noticeable above ground. With broad mites, growers often first see the deformed growth and think of calcium, pH, or light. That is exactly why the combination of visual inspection, magnification, and monitoring is worthwhile. If you also want to rule out deficiency symptoms properly, articles such as Calcium deficiency in cannabis plants: identification and correction or Fertilizing cannabis: mastering nutrients, dosage, and common mistakes can help.
Where pests come from: sources of introduction that are often overlooked
Pests do not simply appear out of nowhere. In practice, they almost always enter the grow through plant material, clothing, pets, open windows, soil, tools, or insufficiently cleaned rooms. We especially often see introductions through new cuttings, mother plants from outside sources, or garden plants located near the grow. Anyone working outside in the garden and then going straight into the indoor room brings in pests faster than many realize.
Cuttings are a classic risk point. A cutting can look healthy on the outside and still carry eggs, larvae, or barely visible mites. That is why new plant material should always be observed separately, ideally in quarantine for 7 to 14 days. During this time, inspect leaf undersides daily, place sticky traps, and use gentle preventive measures if needed. That is exactly why the source matters so much. Anyone who starts with vigorous, cleanly produced starting material often saves themselves a great deal of trouble later. This also fits with Growing cannabis cuttings successfully: the guide from arrival to harvest.
The substrate also plays a role. Permanently moist soil, algae growth on the surface, dead plant debris, or constantly wet saucers create ideal conditions for fungus gnats. In coco or rockwool, other mistakes are more common, such as uneven moisture or hygiene issues around irrigation systems. Anyone who wants to avoid pests long term must therefore not only fight the insect, but also make the habitat unattractive.
Prevention instead of constant treatment: what really works in practice
In cannabis cultivation, prevention is far more effective than constantly reacting. A clean room, stable environmental values, and consistent plant hygiene massively reduce pressure. In our experience, even a simple protocol helps a lot: shoes or overshoes only for the grow, wash hands, disinfect tools, remove plant debris immediately, keep outside plants out of the room, and always place new cuttings separately. It sounds basic, but it often saves you from an entire summer battle against thrips or mites.
For climate, moderate daytime temperatures of around 24 to 27 °C and good air movement have proven effective in many indoor setups. Extreme dryness promotes spider mites, and stagnant air helps almost no grow. At the same time, the substrate should be allowed to dry back sensibly between waterings instead of staying constantly wet. Fungus gnats in particular benefit from surface moisture and organic material. A drier upper substrate layer, clean pots, and controlled watering make a major difference.
Biological prevention is especially worthwhile in recurring systems, mother rooms, or greenhouses. Beneficial insects such as predatory mites against thrips or spider mites, Hypoaspis or Stratiolaelaps against soil-dwelling stages, and nematodes against fungus gnat larvae can be very effective when used early and appropriately. The most common mistake here is releasing beneficials only once the infestation is already severe while unsuitable spray residues are still present on the plants. In that case, they work much less effectively or not at all.
Targeted pest control: what makes sense for each type of infestation
With a light infestation, speed matters. Isolate affected plants immediately, remove heavily damaged leaves only where it makes sense, and begin with a targeted measure instead of switching products at random. Against thrips, combinations of blue traps, predatory mites, thorough treatment of leaf undersides, and repeat intervals work well depending on the stage. Eggs are not affected by many contact products, so a single application is almost never enough. A 3- to 4-day inspection rhythm is more realistic here than “spray once and done.”
With spider mites, you need to be especially consistent. Heavily infested leaves or entire plants can become the source for the whole room. In our experience, only a clean three-part approach works: climate adjustment, direct control, and follow-up inspection. Anyone who only sprays but leaves temperature and dry air unchanged often fails to get the problem under stable control. In addition, mites like to sit deep in the canopy and on leaf undersides; superficial coverage achieves little. During flowering, you also need to be very careful because residues on the flowers can become a quality and health issue.
Fungus gnats are best controlled at the root of the cause. Yellow traps catch the adults, but they do not solve the larval problem. Drier surfaces, nematodes in the irrigation water, and if necessary a thin, unattractive cover over the substrate surface are useful. With aphids or whiteflies, early mechanical reduction combined with biological antagonists can work very well. With broad mites, fast action is crucial because mother plants and young shoots can otherwise be damaged long term. This is not the place to experiment; use a clear strategy and monitor the crop closely.
Special caution during the flowering stage
During flowering, the rules change. What is still acceptable in veg can ruin the harvest later. Dense flowers retain moisture, residues, and dead insect remains. Spray treatments increase the risk of mold, especially if air movement and dehumidification are not properly managed. Ideally, pest pressure should already be largely under control before flowering begins. Anyone who only discovers a major spider mite or thrips infestation in week 5 or 6 of flower has only limited clean options left.
A common misconception is that during flowering you can simply “dose more carefully” and then treat everything as before. The problem is not only the dose, but also the location: flowers are sensitive, difficult to wet completely, and later hard to keep residue-free. In practice, damage limitation is often the only option: remove heavily infested plant parts, optimize the climate, stop the spread, and assess harvest quality realistically. If pests lead to wounds and moisture pockets, the risk of Botrytis also rises significantly. Relevant here are Botrytis in cannabis: causes, identification, and control as well as Cannabis flowering stage: how to manage yield, resin production, and quality.
Especially in late flower, restraint is often more professional than actionism. Not every plant can be perfectly saved at every stage. Sometimes it is better to remove an infested plant decisively than to endanger the entire crop and final quality with unsuitable measures.
Typical mistakes in pest control
The most common mistake is misdiagnosis. Pale spots are treated as calcium deficiency, deformed tips as heat stress, weak growth as fertilizer deficiency. Valuable time is lost as a result. The second major mistake is incomplete treatment. Spraying once, then not checking for five days, and being surprised when the infestation returns is a classic. Many pests have short development cycles. If eggs remain untouched, the whole cycle starts again.
It is also problematic to mix too many products without a clear concept. That stresses plants, harms beneficials, and often obscures the causes. We also often see growers treating only the visible plants while ignoring the room itself: pots, saucers, intake areas, poles, corners, and neighboring mother plants are left unchecked. That is exactly where populations survive. After every measure, the entire area should therefore be considered.
Another mistake is making plants more susceptible through cultivation stress. Too much nitrogen produces soft, attractive tissue for sucking insects. Overly wet substrate weakens the roots. Overly dense plantings make inspection and air movement more difficult. If you correct these underlying problems, pest pressure often drops noticeably. That is also why good pest control is always linked to proper watering and nutrient management and should never be viewed in isolation.
When an infestation is no longer just a pest problem
Pests rarely appear alone. A weakened crop reacts more sensitively to deficiencies, root stress, fungal diseases, and yield losses. Especially with prolonged infestations, mixed symptoms are often seen: damaged leaves, impaired nutrient uptake, stalled growth, and secondary fungal problems. In such cases, it is not enough to simply reduce insect numbers. You need to bring the plant back into a stable metabolism, which means checking the root zone, climate, light intensity, and nutrient management as well.
If mother plants or cutting stock are affected, special caution is required. Problems spread quickly throughout the entire operation there. In cases of recurring, hard-to-explain growth deformities, other causes should also be considered, such as viral pressure or permanently weakened genetics. Not every distorted shoot is automatically mite damage. That is why hygiene, quarantine, and reliable sourcing are especially important for cutting stock. For further reading: Preventing and treating pests & diseases in cannabis cuttings and HLV-free cuttings: the silent killer of your harvest.
If an infestation gets out of control, valuable mother genetics are affected, or there is uncertainty regarding products and residues, professional advice is advisable. This applies especially to larger crops, greenhouses, and recurring problems where an integrated strategy is needed.
Sources
- CABI – “Invasive Species Compendium and Crop Protection Resources", 2023
- University of California Agriculture and Natural Resources – “Integrated Pest Management for Greenhouse Crops", 2022
- Cornell University Integrated Pest Management – “Greenhouse IPM: Scouting and Common Pests", 2021
- Royal Entomological Society – “Spider Mites, Thrips and Whitefly in Protected Crops", 2020

About the Author – Hannah
Hannah focuses on researching, contextualizing, and observing current developments in plant care and modern cultivation techniques. Her focus lies on new methods, optimizing growth conditions, and making complex topics accessible. Her content complements practical experience with analysis, updates, and a keen eye on emerging trends.
Content is regularly reviewed and updated.
This article was created with AI support and editorially reviewed.
More about the team behind LeafConnect